The Instagram Contact tool
Introduction
If you’re looking for a way to automate your Instagram messaging and engage with your followers more efficiently, the Su Social Contact Tool could be just what you need. With this tool, you can send messages to other users from supported extraction links and set the contact tool to contact new followers and reply to new messages. However, it’s important to use the tool with caution. In this guide, we’ll provide an explanation for the sections we have on the contact tool to help you use it effectively.
How to access the Contact tool?
To access the contact tool, just click on your account on the TOOLS view, then click on the Contact tool from the list of tools we have for Instagram accounts.

The tool has six tabs, Extracted Users, Auto Extract, Use Extracted Users, Send Message To New Followers, Auto Reply To New Messages, and Send Messages.
Extract Users Tab
This tab is where you can provide the tool with the sources (links) from which you wish to extract the users that you want to contact.
The Extract Users Tab consists of three sections:
EXTRACT USERS Section

- Allows you to set how many users to extract from the source you added.
- This is the box where you need to add the source you want to extract users from. Check the placeholder to see the links we support as sources.
- EXTRACT USERS to start the extraction
- This is a button that you can use if you want to stop ongoing extractions.
- This is an option that allows you to group extracted users.
➡ It allows you to automatically create groups from extracted users and contact them as a group
➡ When sending the DMs with the API, the maximum number of users in each group will be 32, while when using the Embedded browser the limit is 15 users per group.
USER FILTERS Section

This section allows you to set some filters which will be applied to the extracted users.
- Users that fail any of the filters you check, will be skipped and won’t be extracted.
- The more users you applied the harder it becomes to find users that can pass those filters, so it’s better to use only necessary filters and good sources.
- The more filters you apply the more API calls will be needed to check those filters.
The Results
At the bottom of the Extract Users Tab, you will be able to see a table that will contain the results of the extraction operations you started.

The table will contain:
- Date – when the extraction was made
- Link – showing the link used for that result item
- Status – showing the status of the extraction, it should be done when the finishes successfully.
- Scroll time – shows how long took the scrolling on the result page in seconds
- #EXTRACTED – shows the number of users that were extracted.
Auto Extract Tab
The Auto Extract sub-tab in Su Social’s Contact Tool operates similarly to the Extract Users sub-tab. However, there is a key difference: while Extract Users requires you to manually add extraction links and initiate the extraction process each time, Auto Extract allows you to add extraction links that will be scraped automatically at set intervals. With Auto Extract, you can set up regular scraping intervals so that Su Social will automatically extract user information from your chosen links every X hours.

- STATUS – shows the status of the tool with a button to switch the tool on and off (start/stop the tool).
- The box where you should add the links that you want to keep extracting users from. (It supports the same links supported on the Extract Users tab)
- SPLIT ITEMS WITH SPECIFIC ACCOUNTS – Allows you to split the links you added with the specific accounts inside Su Social
➡ If for example, you added 6 links, then split them and selected 2 accounts, then the tool will remove 4 links from the original account and split the removed links into the selected accounts, so as result, each account will have 2 links added on the box to extract users from. - This option is useful if you want to set the extraction to be at a specific hour.
- This option is useful if you want the extraction to happen every x hours.
- Execute between X-Y allows you to set an interval in which the tool can execute the extractions.
- Allows you to set how many users to extract from each source added.
- Allows you to set the tool to split the extracted users between accounts that have same tag.
- This option allows you to group the extracted users to contact them as a group.
➡ You can also set the filters to be applied on the extraction from the USER FILTERS section.
➡ The results will be added to the Table at the bottom of the Auto Extract Tab.
➡ The Auto Extract is useful when you want to keep extracting followers of a target account, this auto-extract will allow you to keep extracting new followers they get.
Use Extracted Users Tab
This is where you will find all the extracted users from the Extract Users and Auto Extract tabs. This tab has two main sections:
A. SELECT USERS FROM THE LIST

This is where you can select the users you want to send the message to from the list of extracted users, you can do that by ticking the check box next to the user on the table above.
💡 We also have several action links available in the extracted list as you may have noticed.
- Options for – Advanced Selection, Remove Selected, Export Selected, and Import Users
- Buttons to – Select All, Select None on the list
- More Actions button – It will display more options like Split Selected Users Between Accounts With The Same Tag, Split Users and Send To ‘Send Messages’ Of Same Tag Accounts, and Send To Follow Specific Users (use this option if you want to add the selected users to the follow specific users Source of the Follow tool)
B. ADD MESSAGES TO SELECTED USERS

Here you will be able to set up the message that you want to send to the users that you selected.
- A text box where you can add your message that will be sent, we highly recommend using spin syntax to avoid sending the same exact message all the time.
- An option that allows you to attach a photo or a video to your message.
- This allows you to share profiles while sending the message, when enabled you will get a box where you can add the usernames that you want to be shared.
➡ This only works when the account is using the API. - This option allows you to share specific posts, when enabled, you will get a box where you can add post URLs that you want to share.
- Secondary message – This option allows you to set up secondary messages.
- This option allows you to remove the users you select from the list of extracted users after sending them to the Send Messages list.
- This option allows you to ignore users that already received a message from your account.
- This option allows the tool to skip users with whom you already have a conversation
- This option allows you to set the tool to automatically send the message you set the new users that get added to the list of extracted users on section A.
- This option allows you to prioritize messages by adding the new users you send to the top of the pending messages list on the Send Messages Tab.
- Once you are satisfied with your set up and with the body of the message you want to send, and you selected the users you want to contact, click on ADD TO SEND MESSAGES LIST button and this will send the selected users to the pending messages list on the Send Messages Tab.
Send Messages To New Followers Tab
This is the tab to use when you want to set up your account to send messages to new followers you get. Note that this tab is only where you set up the extraction of new followers to be messaged and the message to be sent to them, however, the messages will be queued first on the Contact > Send Messages tab > Pending Send Messages list. You need to switch the Send Messages tab ON to send the messages to the new followers.
After checking the option Send new followers a message (using the contact member module). You will get the section where you can set the execution time for the extraction, filters and the message you want to send to the new followers you get.

➡ In the section above, you will be able to:
- Set the Execution time for the tool – hours when it can execute to extract the new followers.
- Check the user filters that will be applied on extraction – followers that fail any of the filters you check will be skipped.

- A text box where you can add your message that will be sent, we highly recommend using spin syntax to avoid sending the same exact message all the time.
- An option that allows you to attach a photo or a video to your message.
- This allows you to share profiles while sending the message, when enabled you will get a box where you can add the usernames that you want to be shared.
➡ This only works when the account is using the API. - Secondary message – This option allows you to set up secondary messages.
- This option allows you to prioritize messages for new followers, which means when enabled, new followers’ messages will go to the top of the pending messages.
- This option allows you to use the Main account to extract the followers instead of using the scraper accounts.
- Here is where you set when to check for new followers and you can set it to check every x-y minutes and to go through the most recent X followers.
- This option allows you to set the account to accept friend requests when the account is private.
- This option allows you to set the account to reject friend requests when the account is private.
- This option is useful if you want to set the account to automatically accept collaborations.
- This allows you to set a time after which the tool sends the message and you can set it to send the message after x-y hours.
- EXTRACT NOW – The button is useful when you want to Initiate the new followers extraction to happen now.
Auto Reply To New Messages Tab
Enable this option if you want Su Social to regularly check for new direct messages you receive and reply to them. Note that this tab is only where you set up the extraction of new messages to be replied to and the reply text, however, the messages will be queued first on the Contact > Send Messages tab > Pending Send Messages list. You need to switch the Send Messages tab ON to send the replies.

- Shows the Status of the tool with a button that you can use to stop/start the tool.
- This option allows you to set the hours of execution.➡ Enable reply based on trigger words – This option allows you to set the tool to reply based on trigger words, the messages you set for each trigger word will be sent if the new messages you receive contain any of the words you specify on the option.➡ This means that the tool will be sending different messages depending of trigger word that will be detected on the new received message.
- Text box where you can add your message text, you can use spin syntax to avoid sending the same exact message all the time.
- This option allows you to add image/video to your message.
- This option allows you to reply to messages that contain specific keywords.
- This option allows you to skip sending a reply to new messages that contain specific keywords.
- This option allows you to reply to all messages.
- This option allows you to reply to different type of messages, like primary messages, general, request, and hidden messages.
- This allows you to reply to any messages, not only to messages from new users.
- This allows you to approve all when replying to request and hidden message instead of approving one by one.
- This option allows you to prioritize replying to new messages, when checked replies will be added to the top of the pending messages on the Send Messages Tab.
- Use this option if you want to like messages you receive.
- Use this option if you want to like most recent posts of the user that sent you the new message you replied to.
- This option allows you to set secondary messages for your replies.
- This option allows you to set when to check for new messages, you can set it to check every x-y minutes and go through the most recent x direct messages.
- THE EXTRACT NOW – button is useful if you want to Initiate an extraction and force it to happen immediately.
Send Messages Tab
The Send Messages sub-tab. This is where you control the Contact Tool which allows you to set the run timers and number of DMs to send per day and per hour.
SETTINGS Section

You have options to:
- Set the wait time between operations
- Set the number of DMs to send per operation
- Set the max number of DMs to send per day.
- Options to set same settings for Secondary Messages.
- Set the days of the week when the tool will operate.

- Pick messages to send randomly from the pending messages list
- Delete pending messages that are older than x days.
- Keep a max of X pending messages on the pending messages list
- Here you can add your blacklisted users that will be ignored when sending messages.
- Suspend the tool when temporary blocked by x-y minutes.
- Shorten the URLs in your text messages using your configured shorten URLs services (needs to be configured on the connectivity tab)
- Unsend messages after x-y hours.
- Move DMs to general tab after sending the messages.
- Use this option to keep the message in pending list when the message is not sent.
- The execution time for contact tool allows you to set the hours when the tool can operate.
- here you can check the days when the tool will operate, unchecked days will be skipped and the tool won’t work on those days.
PENDING SEND MESSAGE table
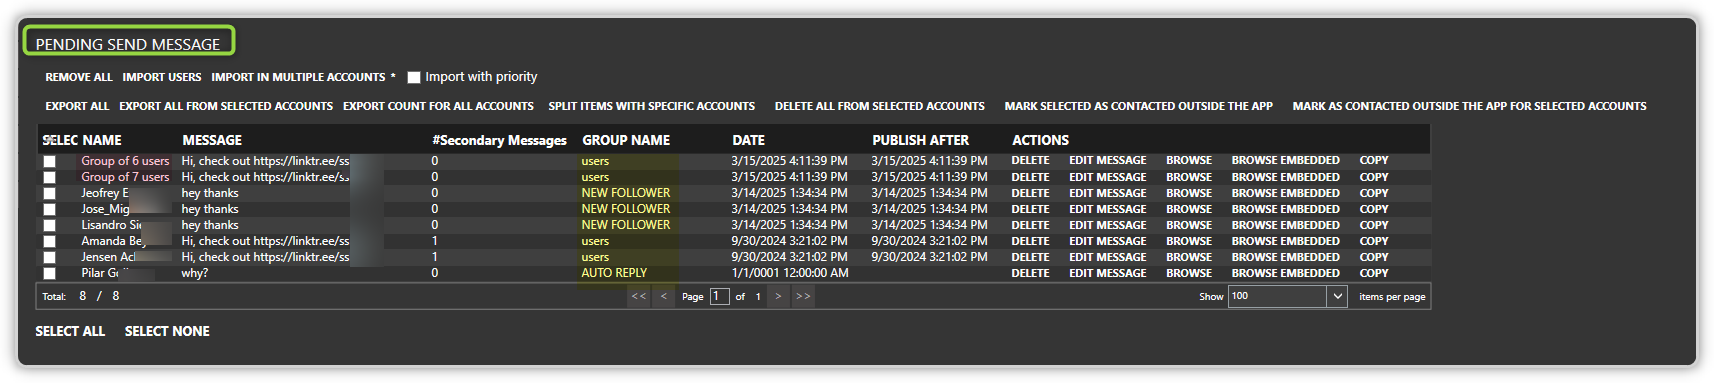
The Pending Send Message table is where all users selected to receive a message from the Use Extracted Users, Send Messages To New Followers and Auto Reply To New Messages features are added and queued for processing. Note that the messages are categorized from where they were extracted (yellow highlight), and users who are added to group chats are labeled accordingly (pink highlight).
There are additional options available such as:
- The ability to remove all pending messages from the list,
- Import users from a list,
- Import into multiple accounts using the correct format,
- Export all pending messages to an Excel file,
- Export the count of pending messages for each account,
- Split items with specific accounts,
- And remove all pending messages for specific accounts.
The RESULTS table

The results table – is where you can find the messages that were successfully sent.
📌 IMPORTANT THING TO KNOW
➡ The contact tool won’t be able to operate unless you start the tool in the Send Messages Tab.
Conclusion
Using our contact tool for Instagram accounts can be a powerful way to connect with your followers and grow your audience. However, it’s important to use the tool responsibly and with care. By following the tips and best practices outlined in this guide, you can ensure that your messages are effective, engaging, and compliant with Instagram’s policies by making sure that your messages are relevant, engaging, and respectful. Avoid sending messages that are generic or impersonal, as they are more likely to be ignored or reported as spam.