The Social Profiles Tab
Introduction
This page is where it all starts. The Social Profiles tab is where users begin adding and managing their accounts.
By clicking on the ADD PROFILE button, you can add the accounts that you will be managing here. As you can see, we currently support the following platforms: Facebook, LinkedIn, Twitter, Pinterest, Email, Reddit, Tumblr, Instagram, YouTube, Quora, and TikTok (Beta). If you have the Professional Plan license, you can also add Instagram Scraper Accounts. The majority of the features are common across all account types, though some may have additional features and tools that are unique to that account type.

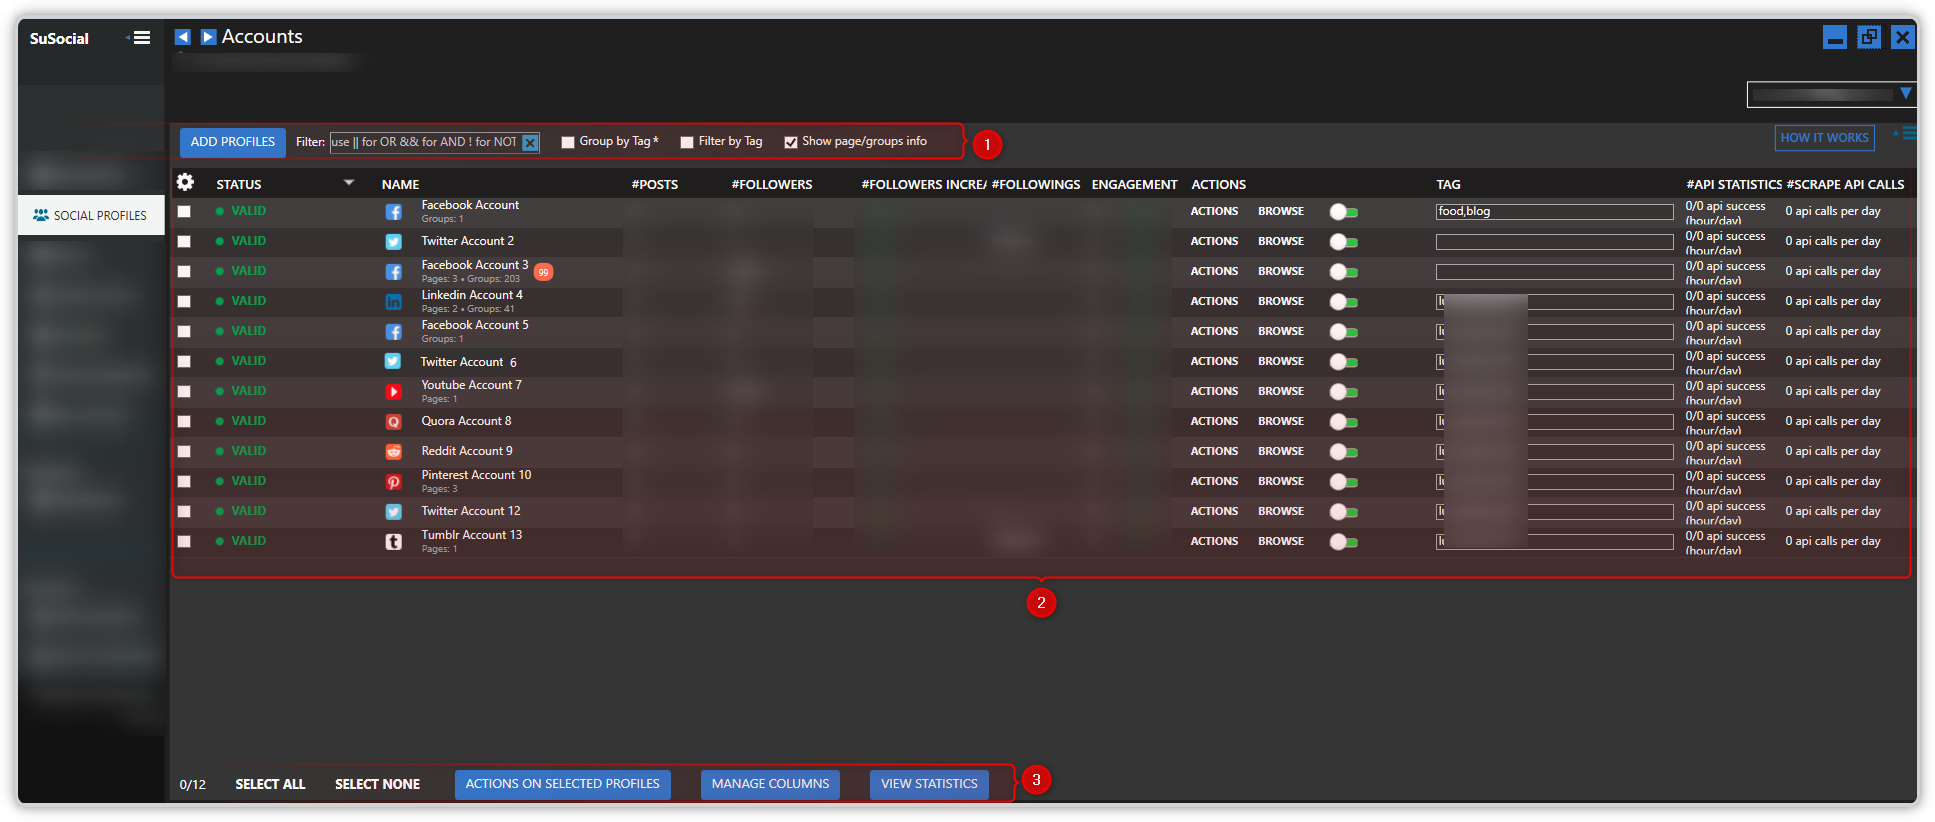
Your accounts will be visible on the Social Profiles page once you have added them. Let’s divide it into three main categories to make it simpler:
- Adding, filtering, sorting, and grouping the profiles
- Accounts
- Action buttons
Adding, filtering, sorting, and grouping the profiles
ADD PROFILE button
You can read the following guides in our knowledge base to learn more about this feature:
Filter
This option allows you to quickly look up an account. Simply type the account’s keyword name, the platform’s name, the account’s status, and so forth.
✅ Simply click the X button on the Filter box to remove the selection.
✅ The following logical operators can be used here:
- AND: Symbol used &&
- OR: Symbol used ||
- NOT: Symbol used !
Group by Tag
The option to Group by Tag will categorize your profiles according to the tag/s you assigned to it and the type of social platform (if you did not assign any specific tags). See the difference below when having it unchecked and checked. Keep in mind that using this option might cause the application to run more slowly, especially if the PC/VPS where SU Social, is installed doesn’t have a standalone GPU.

Filter by Tag
When using the option Filter by Tag, only the accounts containing the specified tag will show up on the Social Profiles view. It is useful when you need to only focus on some specific accounts. Simply choose the tag from the dropdown box to use this option. The tags you added to your social profile accounts will determine the tags that appear here. Additionally, you can tag people based on their status and social media platforms.

Show page/group info
If you want to view the page/group information for your accounts as displayed in the image below, you can use this option.
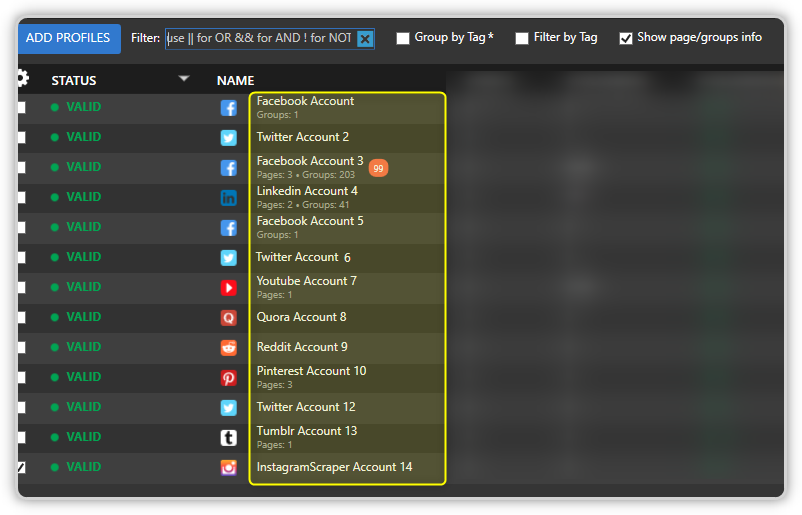
Hide/Show only IG Scraper Accounts
These last two options are only available when you have at least one InstagramScraper Account added (not the scraper accounts added as a regular Instagram account). They are self-explanatory, the first one will hide the InstagramScraper Accounts from being shown while the other one will display only the scrapers.

Accounts
This table shows the list of all accounts you added to SU Social.
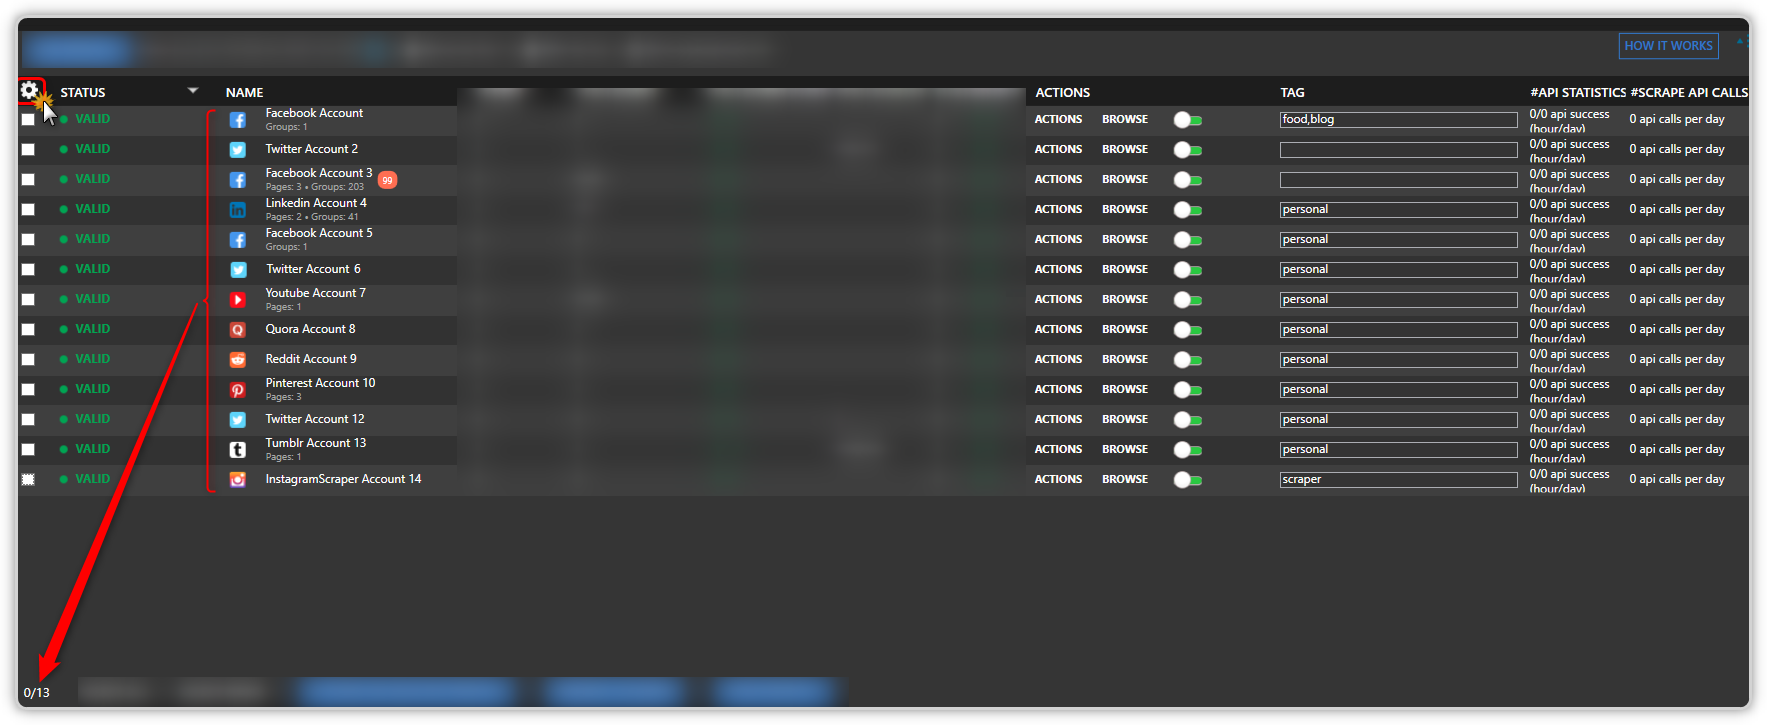
By clicking the “gear” icon to the left of the Status column, you can choose which columns you want to appear on the table, and the width for each column. This will open a window where you can make your selections. The MANAGE COLUMNS button is located at the bottom of the Social Profiles page and is another way to accomplish this.
In the bottom left corner, you can also see the number of selected profiles compared to the total number of profiles in SU Social.
Action buttons
When you want to act on multiple accounts simultaneously, you can use the buttons here. The first things you will see are SELECT ALL and SELECT NONE, which are pretty much self-explanatory.

ACTIONS ON SELECTED PROFILES
You can execute actions on selected accounts in bulk using this unique button’s extensive list of options. It is divided into several categories:
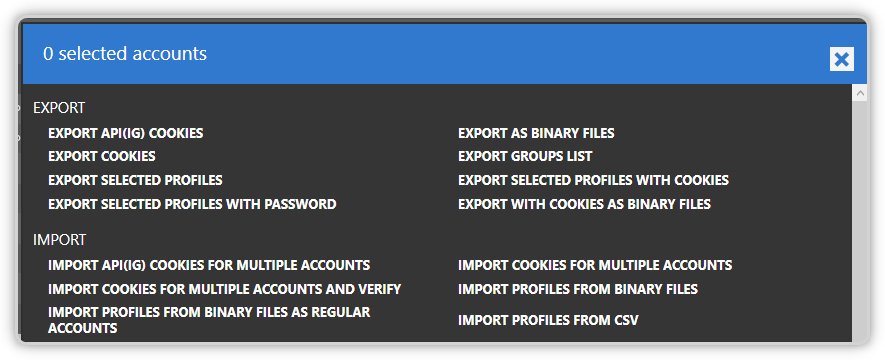 EXPORT
- EXPORT API (IG) COOKIES: If you want to export the Instagram API cookies for the accounts you choose, use this button.
- EXPORT AS BINARY FILES: If you want to export your profiles as a binary file, click this button.
- EXPORT COOKIES: Use this button to export the cookies from the accounts you’ve chosen.
- EXPORT GROUPS LIST: If you want to export the list of groups you have on your Facebook and LinkedIn accounts, use this button.
- EXPORT SELECTED PROFILES: If you want to export particular profiles to a CSV file, click this button. Note that this will not include the account cookies in the file.
- EXPORT SELECTED PROFILES WITH COOKIES: This will export the account selection with their cookies included in the CSV file.
- EXPORT SELECTED PROFILES WITH PASSWORD – just like the previous option, this will export the selected social profiles to a CSV file but the passwords for the accounts will be included in the file. For added security, you will be asked to enter your SU Social password.
- EXPORT WITH COOKIES AS BINARY FILES: Click this button to export the selected accounts with cookies as binary files.
IMPORT
- IMPORT API (IG) COOKIES FOR MULTIPLE ACCOUNTS: If you want to import API cookies for numerous Instagram accounts, use this button.
- IMPORT COOKIES FOR MULTIPLE ACCOUNTS: If you want to import cookies for multiple accounts, use this button.
- IMPORT COOKIES FOR MULTIPLE ACCOUNTS AND VERIFY: If you want to import cookies from multiple accounts and then verify, use this button.
- IMPORT PROFILES FROM BINARY FILES: Use this button to import cookies for multiple accounts.
- IMPORT PROFILES FROM BINARY FILES AS REGULAR ACCOUNTS: useful if you have Instagram scraper accounts exported as binary and you want to import them back in as normal/regular IG accounts to be able to use Tools
- IMPORT PROFILES FROM CSV: use the Export Profiles as a demo file, and specify the platform for each account.
📌 When moving accounts between SU Social instances, you use the option to Export as Binary Files/Export with Cookies as Binary Files and Import as Binary Files. When you do this, the exported file will contain all account information, including the settings, sources, and results from the Tools, and it will be possible to import it into the other SU Social instance.
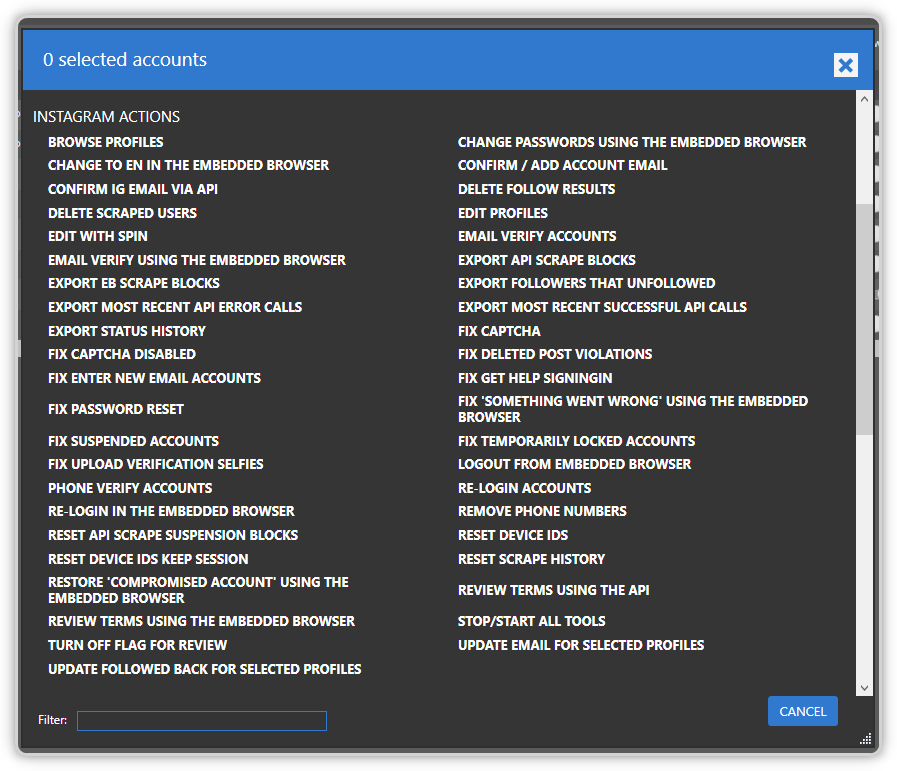
INSTAGRAM ACTIONS
- BROWSE PROFILES: use this button to launch your default browser and access the chosen Instagram accounts.
- CHANGE PASSWORDS USING THE EMBEDDED BROWSER: For the selected account(s), this option will substitute a randomly generated password. Accounts should be in VALID status for this to work.
- CHANGE TO EN IN THE EMBEDDED BROWSER: Use this to switch the Instagram account’s language to English.
- CONFIRM/ADD ACCOUNT EMAIL: You must enter your email and password on the Email Validation tab for this to function.
- DELETE FOLLOW RESULTS: useful if you want to clear the history of the users followed and be able to follow users followed in the past.
- DELETE SCRAPED USERS: useful if you want to clear the scraped users history (scraped with the Follow tool > Send to Extracted Users option).
- EDIT PROFILES: If you want to edit the profiles of many of your Instagram accounts at once, use this button. You will be presented with a CSV file where you can make the desired changes. After closing the file, a popup should appear. Click Yes to apply the changes you made, or No to cancel them.
- EDIT WITH SPIN: If you want to edit Instagram profiles using spin syntax, use this option.

- EMAIL VERIFY ACCOUNTS: Use this if the status of your account is Email Confirmation. For this option to function, the Email Validation tab of the account must be configured.
- EMAIL VERIFY USING THE EMBEDDED BROWSER: Use this option if you want to automatically unblock accounts by running the email verification in the embedded browser (requesting a validation code and extracting it from the email account) after setting up the Email Validation tab from social profiles details.
- EXPORT API SCRAPE BLOCKS: This will export a file that lists the Instagram API calls that are blocked (with please wait a few minutes error) along with the time until they are suspended.
- EXPORT EB SCRAPE BLOCKS: This will export a file that lists the Instagram EB calls that are blocked (with please wait a few minutes error) along with the time until they are suspended.
- EXPORT FOLLOWERS THAT UNFOLLOWED: If you want to export the followers who unfollowed your account to a CSV file, click this button.
- EXPORT MOST RECENT API ERROR CALLS: If you want to view the most recent failed API calls, click this button.
- EXPORT MOST RECENT SUCCESSFUL API CALLS: If you want to view the list of API calls that were successful, use this button.
- EXPORT STATUS HISTORY: Use that option to check the status history of your accounts: email confirmation, phone verification, captcha, etc.
- FIX CAPTCHA: Use this button to solve the captchas for the selected Instagram or TikTok accounts. To make this function, you must have a functioning 2captcha account with credits set up in the Settings > Connectivity tab. You will also need to have an sms provider configured under the Settings > Connectivity tab since IG usually asks for phone verification after the captcha.
- FIX CAPTCHA DISABLED: use this button when you want to solve the captcha disabled status for the selected IG accounts. There are 3 steps involved: captcha fix, email confirmation, and phone verification. You need to have a valid 2captcha account with credits set up and an sms provider configured in the Settings > Connectivity tab for this to work, as well as having the Email Validation tab of the account configured.
- FIX DELETED POST VIOLATIONS: This will solve the deleted post violation alert so the account can get valid again.
- FIX ENTER NEW EMAIL ACCOUNTS: you can use this for fixing accounts wherein IG gives the Enter New Email status. You need to go into Settings > Social Platforms > Instagram > Automatic Actions and enable the option Automatically fix enter new email accounts and add at least one email that does not currently belong to an Instagram account.
- FIX GET HELP SIGNING IN: The “get help signing in” verification issue for the chosen accounts can be resolved with the aid of this option. Keep in mind that for this to function, the Email Validation tab must be configured and that the account password will be changed later.
- FIX PASSWORD RESET: This will apply a password reset fix to the account. The Email Validation tab should be configured for accounts to have the password reset successfully.
- FIX ‘SOMETHING WENT WRONG’ USING THE EMBEDDED BROWSER: This will solve the ‘something went wrong’ issue for IG. You need to setup the Email Validation tab so this option can be used. The password will also be changed after applying this fix.
- FIX SUSPENDED ACCOUNTS: This will solve the suspended/captcha disabled status for accounts. This fix involves captcha fix, email validation, phone verification, and selfie upload. That said, you’ll need to have the following: Email Validation tab should be configured, an SMS provider and 2captcha account with credits under Settings > Connectivity tab, and to setup a selfie folder in on the General tab (Settings>Social Platforms>Instagram) by clicking on SPECIFY VERIFICATION SELFIE FOLDER
- FIX TEMPORARILY LOCKED ACCOUNTS: Use this option if you want to automatically unblock accounts by requesting the security code and using it to reset the password after configuring the Email Validation tab from social profile details. Please be aware that selecting this will modify your account password.
- FIX UPLOAD VERIFICATION SELFIES: This will solve the ‘selfie verification’ status. In order to work you need to setup a selfie folder in on the General tab(Settings>Social Platforms>Instagram) by clicking on SPECIFY VERIFICATION SELFIE FOLDER and make sure you have enough pics. Once a selfie is used it will be moved to another folder so you need to make sure you have enough selfies.
- LOGOUT FROM EMBEDDED BROWSER: To log out of the selected accounts from the embedded browser, use this option.
- PHONE VERIFY ACCOUNTS: If you want to phone verify the chosen IG accounts, use this button. You need to have an sms provider configured under the Settings > Connectivity tab > Instagram phone verification to use this. To set SU Social to phone verify your accounts automatically, go to Settings > Social Platforms > Instagram > Automatic Actions tab > then check the option Automatically phone verify accounts when needed.
- RE-LOGIN ACCOUNTS: If you want to log out and then log back in via the API, use this option. Since this simulates just logging out and logging back in on the same phone, the device ID will not be reset.
- RE-LOGIN IN THE EMBEDDED BROWSER: If you want to log out and then log back in using the embedded browser, use this option.
- REMOVE PHONE NUMBERS: This will remove the phone number for the selected IG accounts.
- RESET API SCRAPE SUSPENSION BLOCKS: On the selected profiles, this will restart the API scrape suspension times.
- RESET DEVICE IDS: If you want to reset the device IDS for all selected accounts, click this one.
- RESET DEVICE IDS KEEP SESSION: Use this if you want to reset just the device id to keep the session. Sometimes this helps get rid of temporary blocks while keeping the current session and not requiring to login again.
- RESET SCRAPE HISTORY: On the selected accounts, the scrape history will be reset for the ones from Follow > Extracted Users and Like > Extracted Posts.
- RESTORE ‘COMPROMISED ACCOUNT’ USING THE EMBEDDED BROWSER: The Instagram password will be changed and the account will become Valid (the previous password is saved in Social Profiles > Notes).
- REVIEW TERMS USING THE API: The accounts’ terms will be reviewed sequentially, not for all at the same time.
- REVIEW TERMS USING THE EMBEDDED BROWSER: Use this when the account’s status is set to Review Terms; it will carry out a Verify operation and cause the embedded browser to process the data policy popup.
- STOP/START ALL TOOLS: when this button is used, for each selected account, if at least one tool is started then it will stop it so all tools will be stopped, otherwise, start all tools that were previously stopped using the same button.
- TURN OFF FLAG FOR REVIEW: This will disable the flag for review option for your IG accounts.
- UPDATE EMAIL FOR SELECTED PROFILES: Emails from Settings > Social Platforms > Instagram> Automatic Actions will be used to replace the current email for the account.
- UPDATE FOLLOWED BACK FOR SELECTED PROFILES: this will run a sync for updating the Followed Back column under the Follow Results tab for the accounts you have chosen.
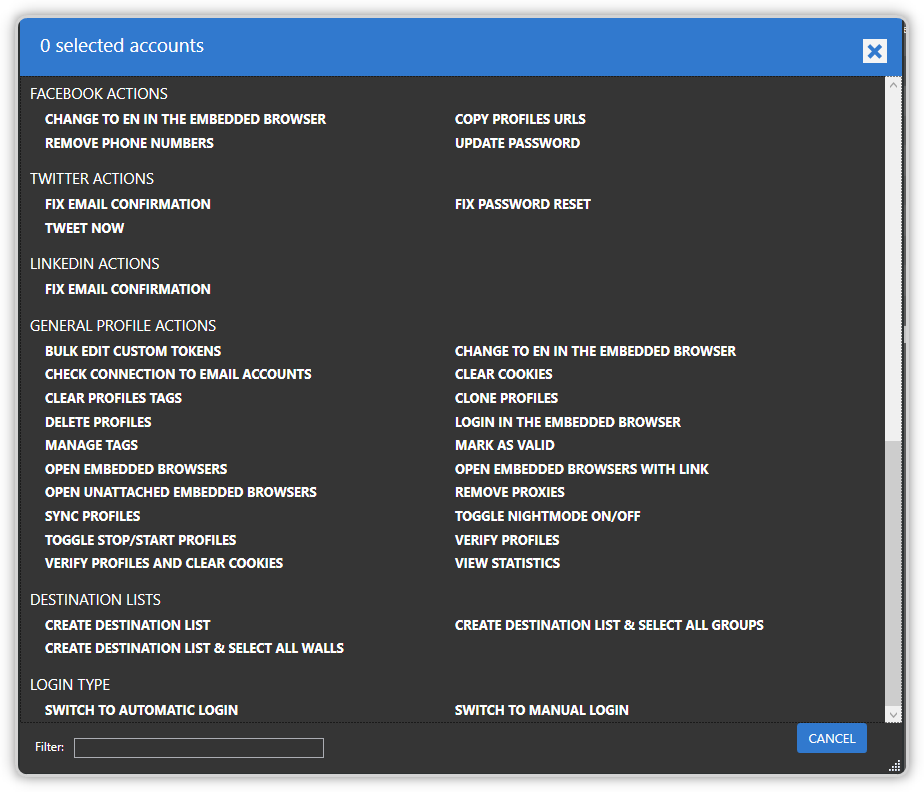
FACEBOOK ACTIONS
- CHANGE TO EN IN THE EMBEDDED BROWSER: as the name suggests, the language of the account will be changed to English.
- COPY PROFILE URLS: use this to copy the Facebook URLs of the selected accounts to the clipboard.
- REMOVE PHONE NUMBERS: To delete phone numbers from your Facebook profile, use this option.
- UPDATE PASSWORD: If you want to change the password for your Facebook accounts, use this option.
TWITTER ACTIONS
- FIX PASSWORD RESET: useful for solving Password Reset status on Twitter accounts. For this to work, the Email Validation tab of the account should be correctly configured.
- TWEET NOW: this allows you to instantly publish text tweets for the selected accounts.
LINKEDIN ACTIONS
- FIX EMAIL CONFIRMATION: This will solve the email confirmation status for LinkedIn accounts. The Email Validation tab of the account should be correctly configured in order for the fix to be applied.
GENERAL PROFILE ACTIONS
- BULK EDIT CUSTOM TOKENS: When you want to edit custom tokens in bulk, use this option.
- CHANGE TO EN IN THE EMBEDDED BROWSER: as the name suggests, the language of the account will be changed to English.
- CHECK CONNECTION TO EMAIL ACCOUNTS
- CLEAR COOKIES: this will clear the cookies for your selected accounts
- CLEAR PROFILES TAGS: this will clear the social profile tags of the chosen accounts.
- CLONE PROFILES: If you want to duplicate the chosen profile to a new social profile, choose this option.
- DELETE PROFILES: this will delete the account from SU Social.
- LOGIN IN THE EMBEDDED BROWSER: If you want the selected accounts to log in through the embedded browser, choose this option.
- MANAGE TAGS: this option allows you to add/remove tags from selected social profiles.
- MARK AS VALID: If you want to mark all selected profiles as valid, choose this option.
- OPEN EMBEDDED BROWSERS: To access the embedded browser of the chosen accounts, click this button.
- OPEN EMBEDDED BROWSERS WITH LINK: If you want to open the embedded browser of the chosen accounts with a specific link, use this option. You will receive a pop-up window where you can add the link before clicking on OK.
- OPEN UNATTACHED EMBEDDED BROWSERS: you can use this option to open an unattached embedded browser—useful if you want to manually navigate to the account on the browser without affecting the actions being executed by SU Social on the main embedded browser.
- REMOVE PROXIES: this will delete the proxies from selected accounts.
- SYNC PROFILES: If you want to force a sync operation across all selected accounts, choose this option.
- TOGGLE NIGHTMODE ON/OFF: this will enable/disable the nightmode setting under Social Profiles > Show Advanced Profile Settings.
- TOGGLE STOP/START PROFILES: Toggle the selected profiles’ start and stop status using this option.
- VERIFY PROFILES: If you want to verify the selected profiles, use the option.
- VERIFY PROFILES AND CLEAR COOKIES: You can check the selected profiles’ validity and delete their cookies using this option.
- VIEW STATISTICS: use this button if you want to see the stats of the selected profiles.
DESTINATION LISTS
- CREATE DESTINATION LIST: Use this button to create a destination list comprised of the chosen accounts.
- CREATE DESTINATION LIST & SELECT ALL GROUPS: Use this option to select all the account’s groups and create a destination list for the account that has been chosen.
- CREATE DESTINATION LIST & SELECT ALL WALLS: Use this option to select the wall and create a list of destinations for the chosen account.
LOGIN TYPE
- SWITCH TO AUTOMATIC LOGIN: the account will be switched to login using the username and password entered in the Social Profile details instead of the manual login.
- SWITCH TO MANUAL LOGIN: the account will be switched to using manual login instead of using the username and password entered in the Social Profile details.
MANAGE COLUMNS
As previously mentioned, you can choose which columns to display on your Social Profiles page by using this button. You can also modify the column’s width.

VIEW STATISTICS
It is the same option as the one we saw under the ACTIONS ON SELECTED PROFILES > GENERAL PROFILE ACTIONS section. You can choose the profiles you want, and when you click the VIEW STATISTICS button, a window displaying the statistics of the accounts you chose will appear.
An example of the display when only one account is chosen:

When two or more accounts are selected, an example display will appear (you can check the group data by account option for a cleaner view per account):

Conclusion
SU Social provides a comprehensive Social Profiles page that helps users manage their social media presence. From adding accounts to filtering and sorting them, the platform makes it easier to manage multiple social media profiles from a single location. With the ability to access a range of tools, users can save time and improve their social media presence.